Clean-Air-Technologies's logo

What Is Mold Abatement And How Is It Different From Mold Remediation?

Have you found mold in your home and are searching up for ways to get rid of it? 

If yes, there’s a good chance you’ve come across two terms, mold abatement and mold remediation.

Now, you might be curious if they’re both the same thing, or if one is better than the other. 

In fact, a lot of homeowners even get confused here. After all, these terms are often used interchangeably at many online forums. 

But in reality, mold abatement and remediation are completely different things. And understanding the differences between them can help you make the right decision for mold treatment in your home.

In my previous blog, I have already explained the mold remediation process

So, in this blog, I’ll walk you through:

  • What is mold abatement 
  • What is mold remediation 
  • How the two are different
  • The step-by-step mold abatement process
  • And when you actually need it

Let’s get into it. 

Key takeaways

  • Mold abatement focuses on complete removal and safe handling of mold contamination
  • Mold remediation focuses on controlling and preventing mold growth
  • Both processes start with fixing moisture issues
  • Containment and air filtration are critical to prevent spreading spores
  • DIY mold removal is risky and often makes the problem worse
  • Proper drying and prevention are key to stopping mold from coming back

What is mold abatement?

Professional applying antimicrobial treatment during mold abatement process to prevent mold regrowth

Mold abatement is the process of completely removing mold contamination from a space. And it is done following strict safety and containment procedures.

Unlike mold remediation, abatement is not just about cleaning visible mold. Instead, it involves:

  • Removing contaminated materials
  • Preventing mold spores from spreading
  • Safely disposing of affected items
  • And restoring the space to a safe condition

You see, mold doesn’t just sit on the surface. It can grow deep inside materials like drywall, insulation, and wood. 

So abatement focuses on eliminating the source of contamination, not just treating what you see.

This is why mold abatement is often used in:

  • Severe mold situations
  • Health-sensitive environments
  • Insurance or regulated cleanup projects

In simple terms, mold abatement is a more controlled and safety-focused approach to handling mold compared to remediation. 

Clean-Air-Technologies's Logo
Angies Super Service
Accredited Business
Aeroseal

Schedule Your Free Estimate Today

Contact us to improve your indoor air
quality with our expert cleaning services in NJ.

What does mold remediation mean?

Professional performing mold abatement fogging to remove mold spores from contaminated area

Now let’s talk about mold remediation.

Mold remediation is the process of cleaning, controlling, and preventing mold growth in a home.

It includes:

  • Identifying the moisture source
  • Containing the affected area
  • Removing or cleaning mold
  • Drying and restoring the space

The goal here is not necessarily to remove every single spore (which is almost impossible), but to bring mold levels back to normal and prevent future growth.

So, while remediation handles the problem effectively, it focuses more on long-term control and prevention, rather than strict removal protocols.

Mold abatement vs mold remediation: What’s the difference?

At first, mold abatement and mold remediation can seem like the same thing. After all, both are used to deal with mold inside a home. 

But the difference really comes down to how both handle the problem.

Mold remediation is focused on controlling the situation. The goal is to clean up the mold, fix the moisture issue behind it, and make sure it doesn’t come back. 

Think of it as a practical and effective approach, just like air duct mold removal, that works for most residential mold problems.

Mold abatement, on the other hand, takes things a step further. It is a more strict and controlled process where contaminated materials are removed, handled carefully, and disposed of safely, especially in more serious or regulated situations.

Here’s a simple way to understand it: 

  • Remediation fixes and manages the problem
  • Abatement removes it under tighter safety controls

In most homes, remediation is enough. But if the mold is widespread, affecting sensitive areas, or tied to insurance or health concerns, abatement is the better option.

In short, here are the differences between mold abatement and remediation:

FactorMold RemediationMold Abatement
Main GoalControl and prevent mold growthFully remove contaminated materials
ApproachClean, treat, and fix moisture issuesStrict removal under controlled conditions
ScopeCommon in residential homesUsed in severe or regulated cases
Process StyleFocus on cleanup and preventionFocus on containment and disposal
When UsedMost everyday mold problemsHeavy, widespread, or high-risk mold cases

Here’s the complete mold abatement process followed by professionals:

Technician wearing PPE sanitizing home surfaces during mold removal process

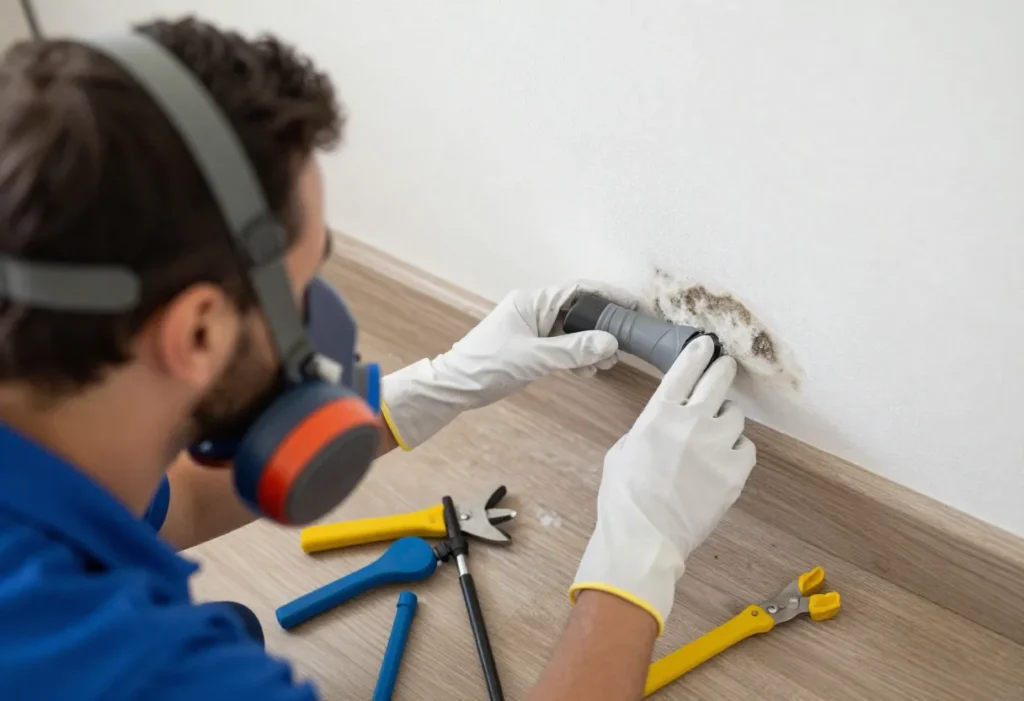
Step 1. Inspection and contamination assessment

Mold abatement begins with professionals taking a close look at the affected area to understand how serious the problem really is. 

You see, what looks like a small patch of mold is often just the visible part. And mold can hide deep behind walls, under flooring, and inside insulation. 

So, the goal here is to find the full extent of the contamination. 

Also, professionals check moisture levels to understand what’s feeding the mold in the first place. 

This step helps plan the entire process correctly.

Step 2. Fixing the moisture source

Before any mold removal begins, the moisture problem has to be fixed. That’s because if moisture stays, mold will keep coming back no matter how much you clean. 

This step includes repairing leaks, improving ventilation, or reducing high indoor humidity. 

The idea is simple: Stop the water source first, then deal with the mold. Without this step, the whole process becomes temporary.

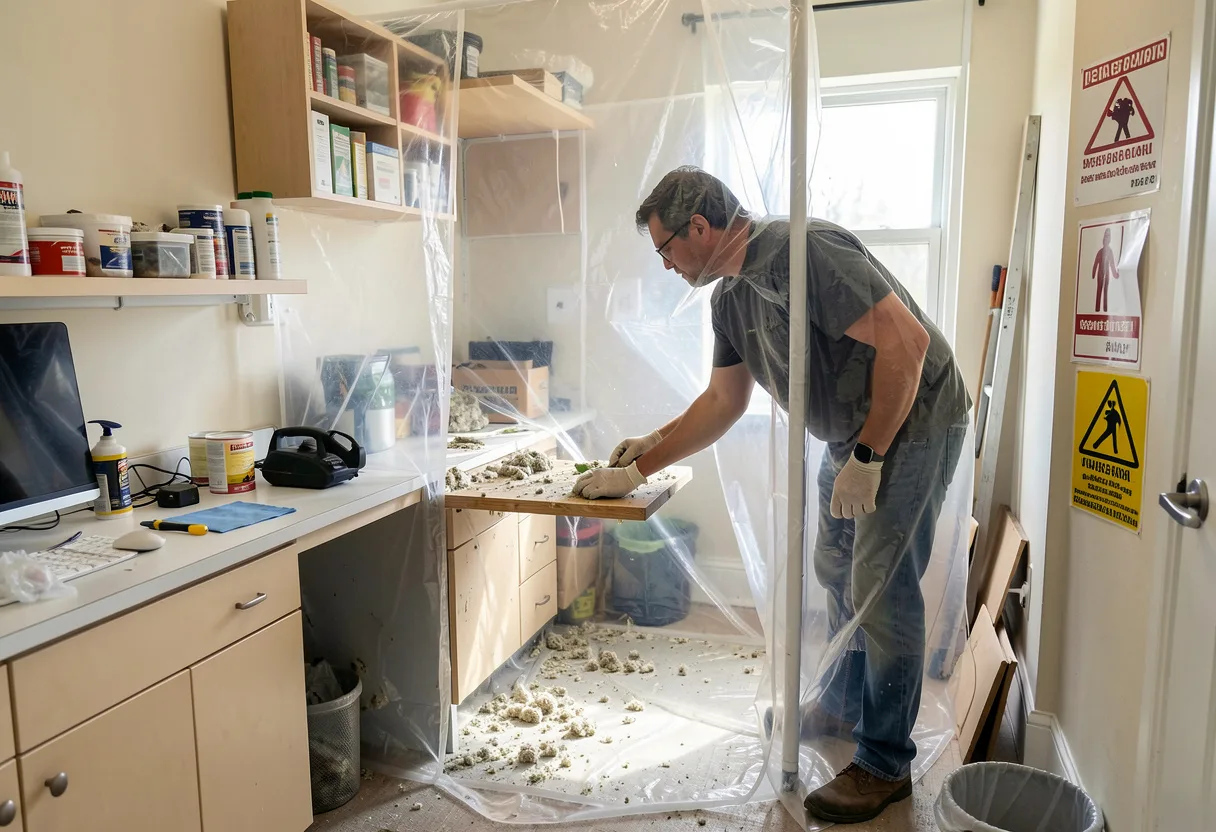
Step 3. Setting up containment

Once the source is under control, professionals isolate the affected area. This is done using plastic barriers and sealed entry points. 

The reason is that mold releases spores when disturbed, and those spores can easily travel through air. 

Mold containment ensures the problem stays in one place and doesn’t spread to clean areas of the home.

Think of it like putting the mold inside a controlled work zone so the rest of your house stays protected.

Step 4. Air filtration and control

After containment is set, the air inside that sealed area is continuously cleaned. 

Professionals use HEPA filtration machines that are designed to trap extremely tiny mold spores. These machines keep running during the entire process to make sure airborne particles don’t escape. 

It is almost like constantly vacuuming the air while work is happening. 

This step is important because it protects both the workers and the rest of your home from cross-contamination.

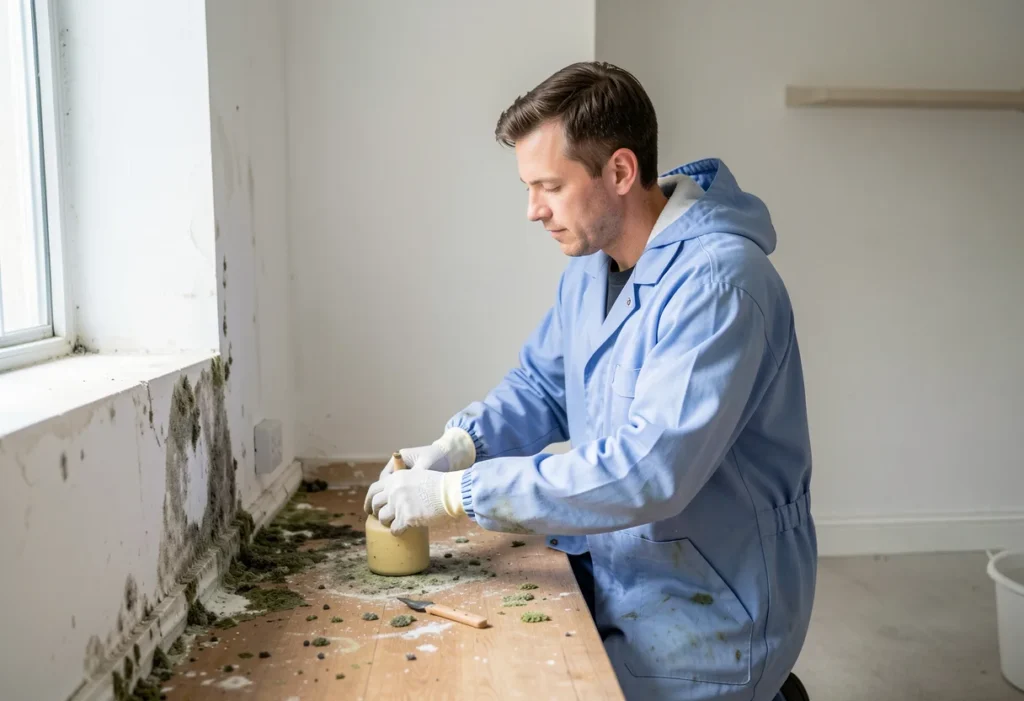
Step 5. Removing contaminated materials

At this stage, any materials that are too damaged to clean are removed. Things like drywall, insulation, carpet padding, and soft wood usually fall into this category because mold grows deep inside them. 

These materials are carefully cut out, sealed in bags, and taken away safely. It might look like a big step, but it’s necessary because surface cleaning won’t solve embedded mold. 

Removing the source is the only way to fully stop the problem.

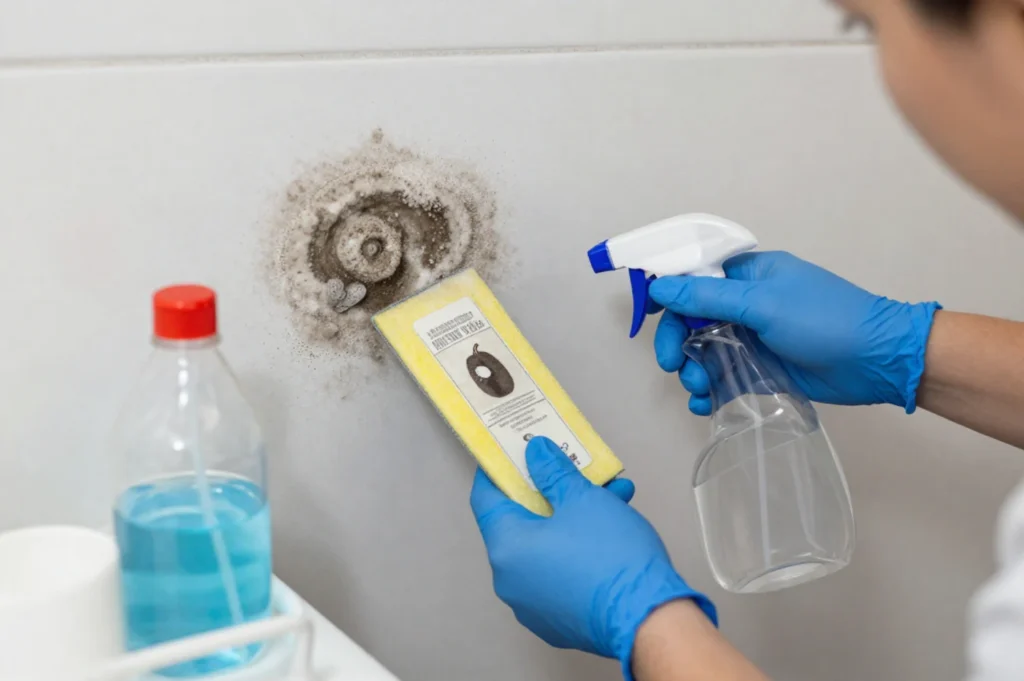
Step 6. Deep cleaning and surface treatment

Once damaged materials are gone, the remaining structure is thoroughly cleaned. This includes exposed wood, framing, and other solid surfaces. 

Professionals use HEPA vacuums to remove fine particles and then scrub surfaces using specialized cleaning solutions. 

In some cases, antimicrobial treatments are also applied to reduce the chance of regrowth. 

This step is very detailed and takes time because even tiny leftover spores can cause issues later if ignored.

Step 7. Drying and dehumidification

Now everything is brought back to a dry condition. 

You see, even if surfaces look dry, moisture can still be trapped inside walls or wood. That’s why commercial dehumidifiers and air movers are used to pull out hidden moisture. 

Also, professionals monitor humidity levels to make sure they return to normal. 

This step is very important because mold only grows where moisture exists. And if drying is incomplete, the problem can easily return in the future.

Step 8. Final cleaning and clearance check

Once everything is fully dry, the area is cleaned one last time. Any remaining dust or particles are removed, and then containment is carefully taken down. 

After that, professionals do a final check to make sure the space is safe. They confirm that there is no visible mold, moisture levels are stable, and the area is ready for use again. 

In some cases, additional testing is done just to give extra peace of mind before rebuilding begins.

Here are all the mold abatement steps in short:

StepWhat HappensWhy It Matters
InspectionContamination and moisture sources are identifiedDefines the full problem
Fix MoistureLeaks and humidity issues are repairedPrevents mold from returning
ContainmentAffected area is sealed offStops spores from spreading
Air ControlHEPA filtration is usedKeeps air clean and safe
RemovalContaminated materials are removedEliminates mold source
CleaningSurfaces are deep cleanedRemoves leftover spores
DryingArea is dehumidified and monitored Prevents regrowth
Final CheckProfessionals inspect and confirm safetyEnsures problem is resolved

Will mold go away on its own?

The honest answer is no, mold will not go away on its own.

In fact, it usually gets worse over time. 

That’s because moisture is present, mold will continue to grow and spread. Even if the surface dries out temporarily, spores remain and can become active again when moisture returns.

So ignoring mold or hoping it disappears is never a good idea. The sooner you deal with it, the easier and less expensive it is to fix.

When do you need mold abatement?

Not every mold problem needs full abatement, but some situations do.

For instance, you should consider mold abatement if:

  • Mold has spread across large areas
  • Materials like drywall or insulation are heavily affected
  • There are strong odors or visible damage
  • Someone in the home has allergies or respiratory issues
  • The cleanup is part of an insurance claim

In these cases, a more controlled and thorough approach is necessary.

Note: You should never DIY mold abatement

It might be tempting to handle mold yourself, especially if it looks small.

But here’s the risk.

Disturbing mold without proper containment can spread spores throughout your home. And what starts as a small issue can quickly turn into a much bigger problem.

Also, without fixing the moisture source, mold will come back. And without proper protective equipment, you may expose yourself to health risks.

That’s why professional handling is always the safer option.

Clean-Air-Technologies's Logo
Angies Super Service
Accredited Business
Aeroseal

Schedule Your Free Estimate Today

Contact us to improve your indoor air
quality with our expert cleaning services in NJ.

Final words 

I am sure that, by now, you have a clear understanding of what is mold abatement and how it differs from mold remediation.

Both are effective ways to get rid of mold, but the right approach for your home depends on how severe the problem is.

The most important thing is this: Mold is not something to ignore or delay. It spreads quietly and can lead to bigger issues if left untreated, so the sooner you deal with it the better. 

Got more questions or want to make sure your HVAC system isn’t contributing to mold growth?

You can get in touch with us!

At Clean Air Technologies, we provide NADCA-certified air duct cleaning in New Jersey. Our professionals bring decades of experience helping homeowners improve indoor air quality and HVAC system efficiency. 

FAQs about mold abatement

What is the difference between mold abatement and mold remediation?

Mold abatement focuses on complete removal under controlled conditions, while mold remediation focuses on controlling and preventing mold growth.

Is mold abatement more expensive than remediation?

In some cases, yes. 

Mold abatement can involve stricter containment and removal processes, which might increase cost depending on the severity.

Can I do mold abatement myself?

DIY is not recommended for anything beyond very small surface mold. That’s because improper handling can spread spores and worsen the problem.

How long does mold abatement take?

It depends on the size of the affected area. Most mold abatement projects take 1-2 days, on average, while larger ones can take several days.

Does mold always come back after removal?

No, mold only comes back if moisture issues are not fixed. Proper drying and prevention stop it from returning.

Is mold in HVAC systems dangerous?

Yes. Mold in HVAC systems can spread spores throughout your home, affecting air quality and health. That’s why regular HVAC system cleaning is essential. 

A Complete Step-By-Step Mold Remediation Process In New Jersey

If you’ve just found mold in your home, you’re probably thinking two things right away:

How do I get rid of this the right way?

And even more importantly, how do I make sure it doesn’t come back?

Now, before we begin, let me first tell you this isn’t something you should panic about. 

A lot of homes in New Jersey run into this problem, and they get rid of it entirely. 

The problem is, when you search online, the advice usually goes one of two ways. It either makes mold sound like something you can fix with a spray bottle and paper towels, or it throws so much technical jargon that it feels overwhelming.

But, this blog is different.

Here, I am going to walk you through the mold remediation process step by step. This is the same process that the Environmental Protection Agency recommends professionals to follow. 

So, let’s get started with it. 

Key takeaways 

  • Mold grows because of moisture, not dirt.
  • Professionals always fix the water source first.
  • Mold spores can spread easily if not contained.
  • Deep cleaning and drying prevent mold from coming back.
  • DIY remediation is risky and often ineffective.
  • Mold prevention is cheaper than remediation. 

What is mold remediation?

For starters, mold remediation is the professional process of finding, removing, and preventing mold growth inside a home. And it isn’t just just about scrubbing a stain off the wall as remediation focuses on removing moisture, which is the root cause of mold.

You see, when mold appears, it usually means something has been wet for too long. So, remediation begins by identifying the moisture source, be it a leak, humidity, or water damage.

The affected area is then carefully contained so mold spores don’t spread through the air. Also, contaminated materials are removed, surfaces deeply cleaned, and everything is thoroughly dried.

This is similar to mold removal in air ducts, but it covers your entire home and not just HVAC components. 

Clean-Air-Technologies's Logo
Angies Super Service
Accredited Business
Aeroseal

Schedule Your Free Estimate Today

Contact us to improve your indoor air
quality with our expert cleaning services in NJ.

Here’s the complete mold remediation process followed by professionals in New Jersey

Professional mold inspection and damage assessment on indoor wall in New Jersey home

Step 1. Mold inspection and damage assessment

The first step of mold removal process involves professionals figuring out what extent of mold damage you’re dealing with.

That’s because when you spot mold, it’s usually just a small stain on a wall or ceiling. But what you see is often only part of the story. 

Mold has a way of spreading quietly behind drywall, under flooring, or inside insulation.

A proper inspection looks at where mold is visible and also where it might be hiding. Here, professionals check moisture levels, test the walls, and identify the source of the problem.

This step is important because it defines everything that comes next. If you don’t understand the full scope of the problem, you can’t fix it the right way.

Step 2. Fixing the moisture problem 

At its very basic mold is a moisture problem. It doesn’t grow because a home is dirty, but it grows because something is wet or has been wet for too long.

So, finding and fixing the moisture source is one of the essential mold removal steps. Here, professionals focus on fixing a plumbing leak, sealing foundation seepage, repairing a roof issue, improving ventilation, or lowering indoor humidity.

Now, since high indoor humidity is also a part of the problem, professionals might also suggest you get an HVAC system cleaning. The idea is to ensure your HVAC system works efficiently and humidity levels are under control. 

I suggest you don’t skip this step, as skipping might cause mold remediation to fail. That’s because even if you remove every visible trace of mold, if moisture is still present, mold will return.

Step 3. Containing mold spores from spreading

This is the step where the actual mold remediation process starts. 

You see, when mold is disturbed, it releases microscopic spores into the air. You can’t see them, but they travel easily. 

And without containment, those spores can spread to other parts of your home.

This is why professionals seal the affected area before mold removal begins. They use plastic barriers, sealed doorways, and controlled entry points to isolate the space. 

Here, the goal is to keep the mold spores contained and protect the rest of your home while the work is being done. 

It is a critical safety step that prevents a small issue from becoming a much larger one.

Step 4. Cleaning and controlling the air

After the affected area is sealed off, professionals clean the air inside that space.

And to do so, they use special air machines with strong filters (called HEPA filters) that capture these tiny particles. These machines pull air in one direction so spores don’t escape into the rest of your home.

Think of it like vacuuming the air while mold removal is underway. This step keeps mold from spreading to hallways, bedrooms, or your HVAC system. 

Step 5. Removing mold-contaminated materials

Not everything can be cleaned.

Materials like drywall, insulation, carpet padding, ceiling tiles, and some soft wood products are porous. This means mold doesn’t just sit on the surface, it grows into the material.

Once that happens, wiping the outside won’t fix it.

In these cases, professionals go about tearing off mold contaminated materials and carefully removing them. They are sealed in heavy bags and taken out of the home safely to prevent spreading spores.

This step might feel like a lot. But removing damaged materials is often the only way to solve the problem.

Step 6. Detailed cleaning of all remaining surfaces

Cleaning mold from wall during mold remediation process in New Jersey home

Once damaged materials are removed, you shouldn’t assume that it’s all done. In fact, this is where the deep cleaning really begins.

Here, every exposed surface inside the contained space is carefully cleaned. This includes framing, subfloors, and any solid materials that remain.

Professionals use a HEPA vacuum cleaner to capture fine dust and mold particles. Then they physically wipe and scrub surfaces using specialized cleaning solutions. 

This isn’t just spraying something and walking away. Instead, it’s hands-on, detailed work.

But why is this process so thorough, you might wonder?

Well, that’s because even after removal, tiny spores and debris can still linger. And if they aren’t cleaned properly, they can settle and grow again if moisture returns.

Step 8. Drying and dehumidification

Now comes one of the most important part, which is drying everything completely.

You see, even if your household materials feel dry to the touch, moisture can still be trapped inside walls, framing, or concrete. And this hidden dampness is exactly what mold needs to grow back.

This is exactly why using commercial dehumidifiers and high-powered air movers is a part of any professional mold remediation process. It helps pull moisture out of the air and building materials. 

Also, moisture levels are monitored carefully during this stage. The goal here is to bring moisture levels back to normal and stable.

Step 9. Final cleaning and containment removal

Once everything is dry, the area goes through one more round of cleaning.

During this step, surfaces are wiped down again, floors are vacuumed, and any remaining dust or fine particles are removed.

Only after this does the containment come down.

And this is done very carefully.

By the end of this step, your space feels clean, dust-free, and fresh. 

This is where you’ll usually notice the difference. The musty smell should be gone by now and the air should feel lighter.

Step 10. Post-remediation verification 

Before you rebuild anything, the earlier mold removal steps need to be re-checked.

This step is all about confirmation.

Here, your home is carefully inspected to make sure:

  • No visible mold remains
  • Moisture levels are back to normal
  • The original water problem has been corrected

In some cases, additional air or surface testing is also done for peace of mind.

Step 11. Repair and rebuild

If drywall, insulation, or flooring was removed during the mold remediation process, this is the stage where you’ll rebuild them.

But here’s what’s important: Rebuilding only happens after the environment is confirmed safe and dry. Otherwise, you risk sealing moisture back inside the walls and starting the cycle all over again.

Here are all the mold removal steps in short: 

StepWhat HappensWhy It Matters
1. InspectionCheck where mold is and where moisture is coming fromUnderstand the full problem before fixing it
2. Fix MoistureRepair leaks, improve ventilation, reduce humidityMold will come back if moisture isn’t fixed
3. ContainmentSeal off the affected area with plastic and barriersKeeps spores from spreading to the rest of the home
4. Air ControlUse HEPA filters and negative air pressurePrevents spores from moving into clean areas
5. Protective GearWear masks, gloves, suits, and eye protectionKeeps workers safe and stops spreading spores
6. Remove MaterialsTake out moldy drywall, insulation, carpet paddingPorous materials can’t be cleaned; mold grows inside them
7. Deep CleaningScrub and HEPA-vacuum remaining surfacesRemoves leftover spores and dust
8. DryingUse dehumidifiers and air movers; monitor moisturePrevents mold from regrowing
9. Final CleaningWipe surfaces again and remove containmentLeaves the space clean, dust-free, and safe
10. VerificationInspect, check moisture, and sometimes testConfirms mold is gone before rebuilding
11. RebuildReplace drywall, insulation, floors, and finish workRestores the home safely after mold is removed

How long does the mold remediation process take in New Jersey?

The honest answer is: It depends on how big the problem is and how wet the materials are.

For a small, contained area, like a section of drywall in a bathroom or a small basement spot, remediation can be completed in 1 to 2 days.

But if you’re dealing with a larger basement section or a full room, it usually takes 2 to 4 days.

Also, bigger projects involving multiple rooms or heavy moisture can take 4 to 7 days or more.

A good remediation team focuses on doing it thoroughly and not quickly. So, if they take an extra day to dry properly, it is always better than doing the job twice.

Here’s how long mold remediation process typically takes in short:

Project sizeTypical time
Small localized area1-2 days
Medium basement or room2-4 days
Large or multi-area projects4-7+ days

Note: Drying and verification often determine the total duration.

How much does mold remediation cost in New Jersey?

The next big question is cost.

Mold remediation in New Jersey can vary quite a bit because every situation is different. The size of the affected area, how much material needs to be removed, and how long equipment must run all play a role.

For a small, contained area, you can expect the cost to range between $800 and $2,000.

But if a full room or a basement section is involved, you’re typically looking at $2,000 to $4,500.

Also, larger or multi-room projects can range from $4,500 to $10,000 or more, depending on complexity.

The biggest cost factors include:

  • How much drywall or insulation must be removed
  • How extensive containment needs to be
  • How long drying and air filtration equipment must run

Here’s how much mold remediation costs in short: 

Project typeTypical NJ cost range
Small contained area$800-$2,000
Single room or basement section$2,000-$4,500
Large or multi-room remediation$4,500-$10,000+

Note: You should never DIY the mold remediation process

Professional mold remediation technician cleaning mold from wall surface

Some mold problems might look small, but the truth is that mold can be tricky and dangerous. That’s why you should never try to handle it yourself.

The mold might look like a tiny spot, but it might have spread inside walls, ceilings, or your HVAC system. Also, you don’t know where the moisture is coming from, which is the root cause of mold. 

Now, trying to clean mold yourself in these situations can make the problem worse, spread spores through your home, or even harm your health.

Bonus: Here’s how to prevent mold after remediation

  • Keep basement humidity below 50%
  • Use dehumidifiers during summer
  • Fix grading and drainage outside
  • Keep gutters clean
  • Ensure bathroom and kitchen exhaust fans work properly
  • Get HVAC systems properly cleaned every once in a while
Clean-Air-Technologies's Logo
Angies Super Service
Accredited Business
Aeroseal

Schedule Your Free Estimate Today

Contact us to improve your indoor air
quality with our expert cleaning services in NJ.

Final thoughts 

I am sure by now you know what a typical mold remediation process in New Jersey looks like. Also, you know the ideal timeline and cost of mold removal. 

You see, mold remediation might seem like something you could handle yourself. But the truth is that it’s not a DIY job. 

Mold can hide in walls, ceilings, HVAC systems, and other hard-to-reach places. And disturbing it without the right tools, protective gear, and experience can actually make the problem worse.

Got more questions or want an air duct cleaning in NJ to prevent mold in your HVAC system? 

You can get in touch with us!

At Clean Air Technologies, we are seasoned NADCA-certified air duct cleaning professionals with three decades of hands-on duct cleaning expertise. And we’ve got all your residential and commercial duct cleaning needs covered on a budget. 

FAQs about mold remediation process

How long does mold remediation usually take in New Jersey homes?

In most New Jersey homes, mold remediation takes anywhere from one to five days. 

Small, localized areas can often be finished in one or two days. 

Larger projects, such as basements or multiple rooms, usually take longer because proper drying and air filtration are required. 

The timeline also depends on how wet the materials are and whether repairs are needed.

Is mold remediation the same as mold removal or cleaning?

No, mold remediation is much more than simple cleaning. 

Mold removal usually includes wiping or spraying visible mold. 

At the same time, remediation focuses on stopping the entire problem. This includes fixing moisture issues, sealing off the area, removing contaminated materials, cleaning remaining surfaces, and drying everything properly. 

Can I safely do mold remediation myself?

You can safely handle very small surface mold, such as a small patch on bathroom tile or a sealed wall. 

However, if mold is inside walls, ceilings, insulation, or spreads over a larger area, DIY remediation is not recommended. 

Disturbing mold without containment can spread spores through your home.

Do I need mold testing before or after remediation?

Mold testing is not always required, but it can be helpful in some situations. 

The most important step is a detailed inspection to identify the moisture source and affected areas. 

After remediation, some homeowners also choose a clearance or verification check for peace of mind. 

Will mold come back after remediation?

Mold can return if the moisture problem is not fixed. 

Proper remediation removes contaminated materials and cleans the affected area, but moisture control is what keeps mold from growing again. 

Leaks, high indoor humidity, poor ventilation, or foundation seepage can cause repeat issues.

This is why you should monitor humidity, repair water problems quickly, and keep basements and bathrooms well ventilated.

Is it safe to stay in the house during mold remediation?

In many cases, yes, you can remain in the home while remediation is taking place. 

The affected area is sealed off using containment barriers and filtered air systems to prevent spores from spreading. 

However, if large areas are involved or someone in the home has asthma, allergies, or a weakened immune system, it may be safer to stay elsewhere temporarily.